
Tip of the Week: Adding photos to albums
Did you know that you can easily organize your photos into albums on Stage 32?
Whether it's your headshots, on-set stills, tear sheets, candids, illustrations, or just some personal photos to add some color and personality to your profile, separating your photos into albums has never been easier.
Today's Tip of the Week will show you how...
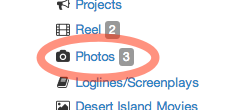
To get started, just click Photos from your profile sidebar.
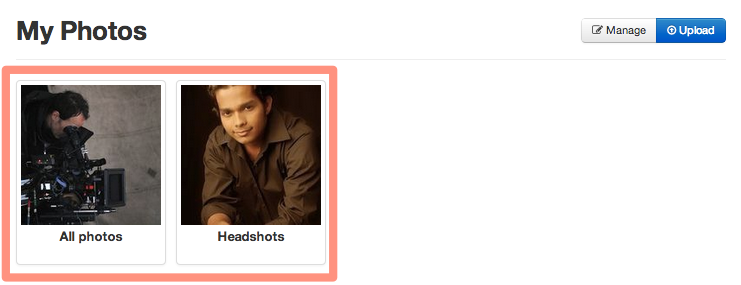
On your My Photos page, you'll see your current albums.
In addition to any albums you've already created, you'll see an album link for All photos as well as an album called Headshots that stores all of the headshot photos you've uploaded to Stage 32.
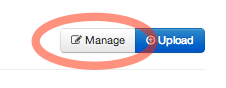
Next, click the Manage button.
From the Manage my photos page, you can edit and delete every photo you've uploaded to Stage 32.
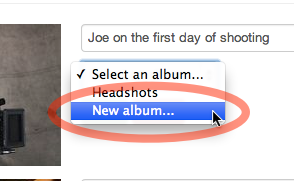
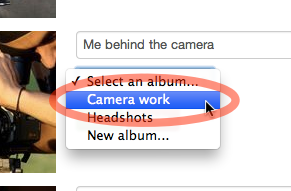
To move your photo into a new album, click Select an album....

From this dropdown, you can select an album you've already created, or create a new album.
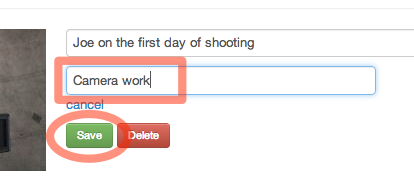
To create a new album, click New album....
Now, just type in a name for your new album and click Save.
This will automatically create a new album and add the photo to that album.
After you've created an album, you'll be able to select that album for other photos as well.
When you're done adding your photos to albums, click Done.
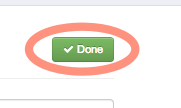
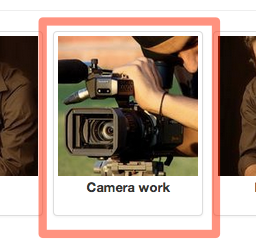
The album you just created will now be shown on your My Photos page.
Adding your Stage 32 photos to albums is a great way to keep your Photos page organized and easy to browse. Get started today!
Tip of the Week Archive
- Adding a Lounge topic to your wall post
- Liking to show support
- Searching your network by name, profession, or location
- Sorting Lounge Discussions by New and Trending
- Sending Stage 32 Invites
- Uploading a résumé to your Stage 32 profile
- Viewing network activity on your Stage 32 Wall
- Updating your current location to find work in your area
- Adding photos to your Stage 32 profile
- Getting Quick Help at Stage 32
- Expanding your Stage 32 Network
- Following and unfollowing Stage 32 Lounge discussions and wall posts.
- Searching Stage 32 members by name, location, and occupation
- Viewing New and Trending Lounge discussions
- Sending Stage 32 Network Requests
- Viewing and managing your Lounge subscriptions
- Adding Video to Your Stage 32 Lounge and Wall Posts
- Adding video and audio to your Stage 32 Reel using the Alternate File Uploader
- Browsing the Stage 32 Lounge by topic
- Getting More Views on Your Content
- Find work with Stage 32
- Searching projects by occupation
- Accessing the Stage 32 Blog Archives
- Uploading multiple résumés to your Stage 32 Profile
- Completing your Stage 32 profile
- Adding content to your Stage 32 profile
- Sending, reading, and managing your Stage 32 Messages
- Finding help and learning how to get started with Stage 32
- Adding Contributors to your project
- Adding photos to albums
- Adding videos to your Stage 32 Reel
- Sharing content from Stage 32
- Editing and deleting videos from your Reel
- Using Lounge post and wall post permalinks
- Stage 32 Buzz
- Save 10% on Writers Store books, software, courses and more!
- Navigating Your Stage 32 Home Page
- Formatting text and adding links to Lounge posts, wall posts, and messages
- Uploading and managing photos on Stage 32 (Part II)
- Uploading and managing photos on Stage 32
- Editing and deleting wall posts, Lounge discussions and comments
- Sharing Lounge discussions and wall posts
- Updating your Stage 32 headshot
- Creating and editing your Stage 32 Profile
- Editing and deleting clips from your Stage 32 Reel
- Accepting network requests and removing people from your network
- Network suggestions
- Posting a project
- Stage 32 Lounge subscriptions
- Posting a video or audio clip
- Following Lounge discussions and wall posts
- Wall post vs Lounge post
 Register / Log In